Tips and Tricks: Windows 7 Auto Login
Configure Your Windows 7 for Automatic Logon
How to Make Your Windows 7 Auto Login - Learn how to set up your computer so that users do not have to type username and password to log on into Windows 7
We have a computer at our home for everyone use, actually it has been configured with Windows Media Center and connected to XBox console, we all are using it for our entertainment purpose and we want to configure our computer to automaticall logon to Windows 7 to futher speed up the Windows 7 boot process.
This Windows 7 Automatic Login tip is especially usefull for computers that are in use by only one user as it would not even be a security risk or any privacy issue.
Let's start make your Windows 7 Auto Login Step-by-Step, Once you sucessfully login to Windows 7:
1) Click Start ![]() , Click All Programs, Click Accessories, and then Click Run
, Click All Programs, Click Accessories, and then Click Run
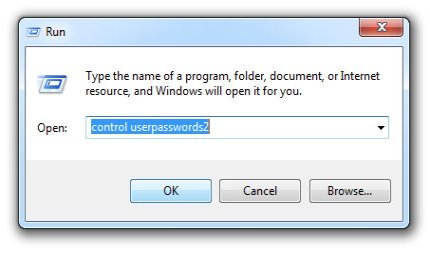
2) Type in the following: control userpasswords2, and then Click OK

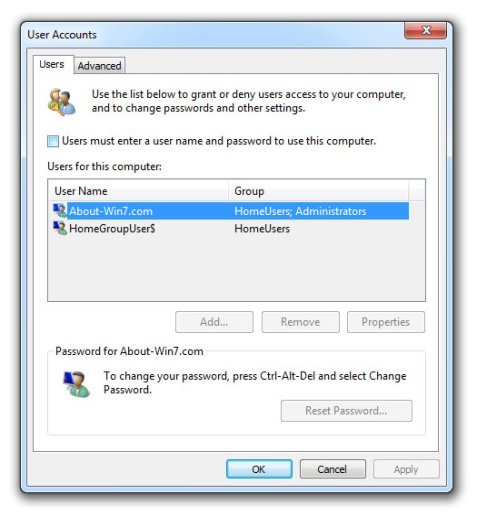
Once you click on OK button, you will see the following screen..
Note: If that doesnt work, Type in netplwiz into the start menu search box, and hit enter key instead.

3) In the above new User Accounts screen that appears select the account you wish to make the primary logon. Uncheck the box that says "Users must enter a user name and password to use this computer", and then click on Apply button.
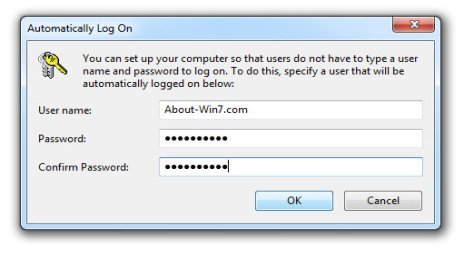
Next you will see the "Automatically Log On" screen

4) Here you type in your current Password and Confirm Password, and then click on OK button.
5) Click on OK button again on User Accounts screen. That's it!
Next time when you boot your PC Windows 7 Auto Login whithout asking User name and Password from your end.
We Hope This Helps You With Auto Logon Windows 7
Top Windows 7 Articles
How to Upgrade Vista to Windows 7
How to Upgrade XP to Windows 7
How to Install Windows 7 Step-by-Step
How to Install Win7 from USB Flash Drive
Upgrade Starter to Windows 7 Home Premium
How to Auto Logon in Windows 7
How to do Partitioning in Windows 7
How to Create a Restore Point in Win7
How to view File Details in Windows 7
